Amalgam
A custom mechanical keyboard with Apple Touch ID
Published · Updated
The problem
If you want Touch ID, Apple gives you exactly one option.
I've loved keyboards for a long time. My first mechanical keyboard was a Das on a Windows machine, and years later I fell deeper into the hobby: building from kits, working with premade PCBs and plates, doing assembly myself, and obsessing over the feel and sound of the final result.
A great keyboard is not just a tool — it's something you interact with constantly. When it's built well, the sensory experience and aesthetics change how using a computer feels, and it becomes very hard to go back to something generic.
But as a Mac user, there was always one thing I hated giving up when going custom: Touch ID. It's one of those features that quietly become essential. Unlocking your Mac, approving Apple Pay purchases, authenticating passkeys — it removes friction from small moments all day long. The problem is that if you want Touch ID, Apple gives you exactly one option: their off-the-shelf Magic Keyboard. Anything else, and you give it up.
And there's no way around that. Apple doesn't license Touch ID for third-party keyboards. No standard path, no supported ecosystem, no kit you can buy. Which is exactly what made the problem interesting.
A couple of years ago, I built my own workaround. I extracted the logic board and Touch ID sensor from a Magic Keyboard, then designed and 3D-printed a custom enclosure to house them as cleanly and compactly as possible. It solved the functional problem, but not the product problem. I still had a second device next to my keyboard: an awkward plastic box, bigger than it needed to be, and completely at odds with the kind of clean, optimized desk setup I'm obsessed with.
I wanted Touch ID built into the keyboard itself. If this keyboard was going to exist, I had to engineer it myself: design one from the ground up that integrates Apple's Touch ID module into a fully custom build.
It started as a personal challenge, but it became something broader — a way to learn PCB design, firmware, CAD, manufacturing, and the countless small decisions that separate an idea from a real physical product. That is what this project is: creating the keyboard I always wished existed.
The technical approach
Two devices, working as one.
I wanted a solution that preserved the things custom keyboards are best at — complete control over physical layout, key mapping, design, and component selection — without sacrificing Touch ID. I had an idea that felt slightly hacky at first, but also promising. If I could implement it cleanly enough, it had the potential to become a polished product.
My approach was to integrate a USB hub directly into the keyboard. Internally, that hub would unify two separate devices: a custom keyboard PCB designed around whatever layout I wanted, and the logic board from an Apple Magic Keyboard required to preserve Touch ID functionality, still connected to its original sensor. From the computer’s perspective, it would silently appear as a USB hub with two downstream devices connected. From the user’s perspective, though, it would feel like a single cohesive device: one keyboard, one upstream port, one cable.
Electronics
Three boards. One cable.
The system consists of three main pieces:
- A custom main keyboard PCB
- A custom USB-C daughterboard with an integrated USB hub circuit
- The logic board + Touch ID sensor extracted from a donor Apple Magic Keyboard
To design the PCBs, I picked a microcontroller to anchor each board, then worked outward from the datasheets, composing complete circuits around them. That pulled me into plenty of side quests: choosing component values, weighing placement trade-offs; and the occasional physics rabbit hole, because circuits live in the physical world and the physical world pushes back. USB signal integrity was a good example: getting a properly impedance-matched circuit meant dialing in copper layer thickness and the spacing between layers, placing and stitching ground planes correctly, and length-matching the USB data lines.
For the main keyboard PCB, I used an RP2040 microcontroller, running QMK firmware with VIA support that I configured and compiled for the board's custom matrix and layout.
The USB hub daughterboard is built around a CH334F USB hub controller. Its job is to route both the main keyboard PCB and the Apple Magic Keyboard logic board through a single upstream USB-C connection, so the entire keyboard presents cleanly through one cable. I took the time to implement proper over-current protection and over-voltage/ESD protection across all relevant lines.
I originally considered 0603 metric (0.6 mm × 0.3 mm) SMD components to keep the circuit as compact as possible and simplify routing, but once you reach 0603, the size of the components is so small that assembly yield becomes a real concern. For that reason, I figured it would be safer to step up one size and use 1005 metric (1.0 mm × 0.5 mm) passives instead.
The hub daughterboard connects to the main PCB through a standard 4-pin JST-SH cable, and to the Apple logic board through a custom 4-pin JST-SH-to-Lightning cable I made for the build.
I designed the schematics and PCB layouts in KiCad, then sent the files to a manufacturer. Both boards are 1.6 mm thick, four-layer PCBs with a Signal / Ground / Power / Ground stackup and no flex cuts. I also spent [an unreasonable amount of] time on small layout details, including filleting every bend so the traces flow through the boards elegantly as continuous curves rather than sharp angles.
The build is not wireless, but the cabled connection is actually a feature for me and not a compromise. I switch back and forth between my work and personal Macs on the same desk setup by switching the Thunderbolt cable that runs to my Studio Display. So by having the keyboard’s USB cable connected to my display, whichever machine I plug into the display inherits the keyboard connection immediately, without requiring me to switch Bluetooth connections every time.
Body and physical architecture
Machined from 6061 aluminum.
I modeled the case in Shapr3D, then sent the files out to get it CNC-machined from 6061 aluminum, then bead-blasted and finished with natural matte anodization. Once assembled, the enclosure has no visible seams. One of my requirements throughout the design process was to minimize the board's height to optimize ergonomics. A lot of careful consideration went into this, as having enough room to fit all the internals would typically require increasing overall height, or having a steeper typing angle to increase rear height.
For the mounting system, I wanted the cleanest sound profile I could get, so I designed the board around a full gasket-mount architecture. The case uses full-perimeter (except for the four screw posts), laser-cut 1.6 mm self-adhesive Poron gaskets on both the top and bottom halves, compressed by roughly 30% once assembled, paired with a 2.3 mm thick laser-cut acetal copolymer (non-Delrin POM) switch plate. Poron is a microcellular polyurethane foam that soaks up vibration rather than passing it along; a good choice for sound dampening applications.
The switch plate has no direct contact with the aluminum case — not through screws, alignment pins, bosses, or any other hard mounting points. It is supported only through the Poron gasket interface. That mechanical isolation was intentional: the goal was to reduce structure-borne, high-frequency vibration transmission into the aluminum body and minimize case resonance.
The gaskets, case feet, and switch plate were also designed in Shapr3D, then sent out for laser-cutting.
On the floor of the lower case, I modeled two recessed beds for the USB hub daughterboard and the Apple logic board, with an internal cable channel connecting them. Everything is secured with TX5 and TX6 stainless steel fasteners throughout.
The top and bottom halves are secured through four bottom-inserted screw posts, distributed evenly around the perimeter to lock the case together without interrupting the exterior surfaces. The bottom surface also has four subtly recessed locations for some laser-cut Poron case feet for additional sound control.
There were a lot of small dimensions and mechanical tolerances to get right: gasket compression, case clearances, Touch ID travel, USB-C alignment, and enough internal volume for the hub, Apple board, and cable routing.
Touch ID integration
Touch, or click.
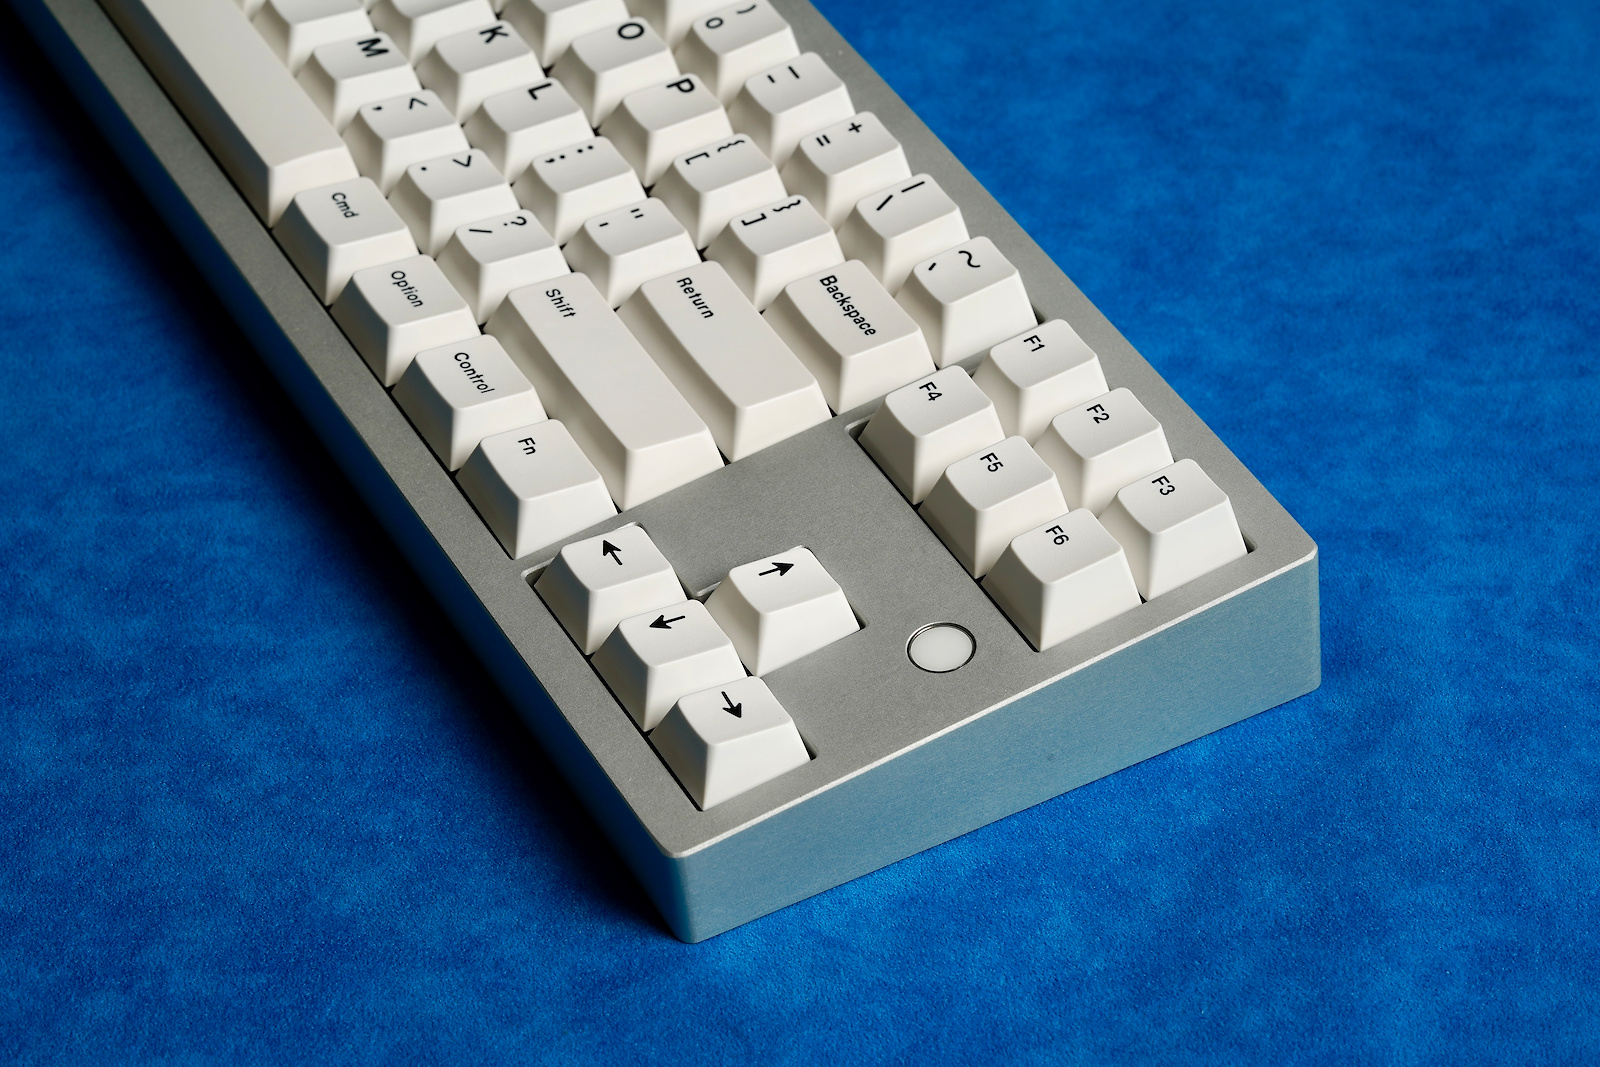
I wanted the round Touch ID sensor to sit flush with the enclosure surface, and also wanted to retain the convenience of clicking the Touch ID sensor to lock and unlock my Mac. On a Magic Keyboard, the sensor sits on top of the aluminum case, as opposed to emerging from beneath the surface, so I designed a new mounting architecture that consists of an internal cradle for the sensor, and a 3D printed support bracket that keeps the sensor flush to the top surface while preserving the physical button functionality. That is accomplished through the bracket having four cylindrical rails that perfectly fit the four posts on the sensor module. When pressed down, the four sensor posts slide down the cylinders with no wobble, and the center post on the bracket presses against the tiny tactile switch that is underneath the sensor.
Eliminating movement across axes other than the vertical one required getting the placement and internal diameter of the cylinder rails right very precisely, and took about a dozen iterations with very small changes on the order of 0.1 mm. This is where the fast feedback loop of having a 3D printer at home really shines, making it possible to go through all these iterations quickly until the fit is perfect.
Form factor & layout choices
Opinionated design.
Minimizing the footprint of my layout is important to me. That is because I like the alpha cluster to sit centered in front of the display, and the wider the keyboard gets, the farther my trackpad is pushed to the right. But I do like dedicated arrow keys. For that reason, tenkeyless (i.e. TKL, meaning no number pad) felt like the right general format.
At the same time, the six-key cluster above the arrows was never especially useful to me in its default form, so here I treated it as a small 3×2 macro pad instead, which I could map to whichever shortcuts or workflows ended up being most useful. That layout also created useful internal space between the macro section and the arrows, giving me room for the main circuitry on the PCB and the Touch ID sensor integration into the case.
I’ve also never been a fan of function rows, and I prefer the proportions of a narrower board. So I ultimately went with a function-row-less tenkeyless layout (FRL TKL). One nice side effect is that the final keyboard is almost exactly the same depth as an Apple Magic Trackpad, which is aesthetically pleasing.
Since there’s no function row, I went with a split Backspace layout so that the Escape key could stay in its traditional top-left corner while still retaining a tilde/backtick key above Backspace. The PCB also supports a standard Backspace, both in case I ever want to switch back and because I’m planning to build a unit for my brother, who prefers that layout.
Otherwise, the board is intentionally fixed-layout. I understand the utility of multi-layout PCBs for a commercial product, but for this project I wanted the physical design to be opinionated rather than universal.
The result
The final build works exactly as envisioned: the keyboard runs QMK firmware with VIA configurator support, Touch ID works flawlessly with zero additional latency or quirks, and the whole system connects through a single USB-C cable.
Touch ID works just as it does on a Magic Keyboard: the Apple logic board pairs with the Mac seamlessly and establishes a secure connection to its Secure Enclave. Fingerprint enrollment, storage, and matching all happen on the Mac. The keyboard provides the sensor but stores no biometric profiles of its own, so it works with the fingerprints enrolled on the paired Mac.
All in, the build came to about $1,600. The biggest single line was the one-off CNC-machined case at around $700, and about $200 of the total was tuition: a dead Touch ID logic board, a hub daughterboard revision with one incorrect trace that made it non-functional, and a first switch-plate order that didn't meet my standards. But I never measured the spend as a keyboard purchase. It bought two things: the keyboard I'd wanted for years, and a panoply of learnings and skills that will benefit every future project. On those terms, it was easily worth it.
It’s hard to capture how satisfying it feels to use, but here’s a glimpse of the experience.
This is the Amalgam, a custom mechanical keyboard with fully integrated Touch ID.
Spec sheet
